
Stair Tread Returns and Installation with P-System
Make14mm P-System slot in edge of tread and bullnose return Drill 6mm access hole in bottom of tread for male Clamex connector, using drill jig Glue and assemble nosing to tread with Clamex P-14 by engaging cam lock Create stop block to reference P-System slot in riser Use same stop block against bullnose return ear…
Read More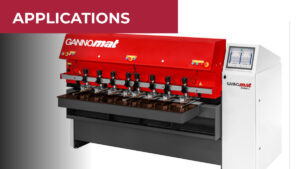
Making P-System Slots with the Gannomat Machining Centers
Gannomat Index machining center with P-System aggregate Upload the P-System connector using Gannomat’s integrated software toplace the location of each connector on your workpiece Programs can be edited, saved, and viewed for easy repeatability and qualitycontrol Load components onto machine and clamp down using foot pedal View from inside the Gannomat machine as it mills…
Read More
Closet Solutions with Lamello
L-Shelves with Clamex P-14 Consistency in product quality: Zero edge-banding material on separate components
Read More
Ceiling Beam Assembly with P-System
How It works Lay out center lines for connectors on facias and soffit Set Zeta P2 to “14” for the P-14 connectors Set flip stop to desired angle and use the spacer plate if necessary. *Or use stop square for long point referencing Machine P-System slots Using drill jig, drill 6mm wrench access hole for…
Read More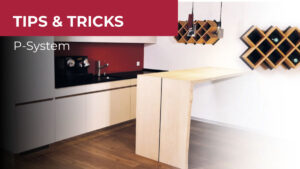
Dividing Panel Joints From 19mm with Tenso P-14
Would you like to connect dividing panel joints invisibly to one another? The offset installation of the Tenso P-14 allows glued joints from a material thickness of <br />19mm to be realised in almost no time. Use a template with uniform spacing instead of marking repeatedly. Clamp the template on the dividing panel as a…
Read More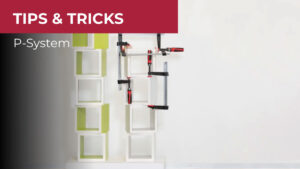
Gluing Made Easy Thanks to Tenso P
1. Cut all components. 2. Slide in the connectors. 3. Apply glue. 4. Press in the preload-clip to make it easier to join the components. 5. Assemble the components. 6. Ready-glued carcase without waiting times and without any clamps or adhesive tape.
Read More
Lamello Zeta P2 Best Practices
Hi, this is Chris from Lamello and in this video I’m going to show you some basic simple best practices for using your new Zeta P2 or Zeta P2 Cordless. It’s always recommended that we use dust collection with the Zeta — just to keep things cleaner, have a better quality cut, and also so…
Read More
How to start using the Lamello Zeta P2
Hey everyone, this is Chris from Lamello USA. Today we’re going to unpack the Zeta machine for you, show you everything that comes in the machine and what it’s used for. So let’s get obviously started. Got your Zeta machine. One of the most important accessories is the stop square. We’ve got a few other…
Read More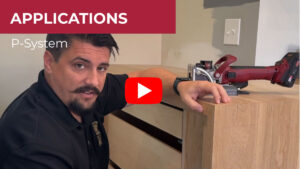
How to Join Waterfall Bevel Joints in Thick Material with No Clamps
Hey everyone, it’s Matt from Matt Moore Designs and we’re here in our most recent kitchen renovation where we just finished the installation process of this bar area. The area consists of a beverage cooler, a stack of drawers, but most eye-catching is this solid 8/4 grain wrapped waterfall countertop. Traditional clamping methods to create…
Read More
Hybrid Zeta P2 + CNC Positioning Pin Method
Precise drilling on a CNC machine, use these drill holes to position the Zeta P2 to cut theP-System grooves. This application is especially ideal if the CNC machine is a nesting machineand or no aggregate is available. This method combines the precision and efficiency of aCNC machine and uses the simple and fast machining of…
Read More
Clamping Miters in Thick Material
Mark the connector position and cut the profile groove with the Zeta P2 For the offset groove: Slide on the stop square and set the position Check the cutting position with the machine to prevent cutting through Place the Zeta P2 with the stop square on the outer face and cut the offset grooves Drill…
Read More
False Drawer Fronts with Tenso P-14
Set Zeta P2 to the 14mm depth setting for Tenso P-14 connectors on the back side of the drawer face Use stop square to create an outside reference fence Run 14mm deep P-System slots on back of drawer face Insert male Tenso P-14 halves into back side of drawer face Set Zeta P2 to the…
Read More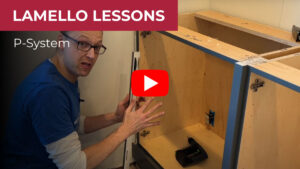
How To Install Cabinet Face Frames, Filler Strips and Scribes with the Lamello P System
Hey, I’m Keith from Keith Johnson Custom Woodworking, and today we’re on-site doing an installation of a 15-foot built-in. We’ve got painted cabinets below, rift sawn white oak cabinets going above. We have the first run of cabinets in, but we need to scribe our filler strips. Now, this is all pre-finished material, so using…
Read More
Slat Wall with P-System
How it works: Determine and mark spacing for Tenso connectors Determine and mark spacing for each slat based on material thickness and reveal Extend marks for reference on top and bottom Using a piece of scrap wood, cut spacers to match your reveal Connect spacers to a straight edge with hot glue near the ends…
Read More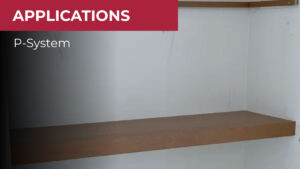
Floating Shelves with P-System
How it works: Establish control line for front edge; then scribe left, right and back edges of shelf Transfer scribe lines to shelf components Lay out center lines for connector slots Machine slots, referencing finished side with stop square Install Tenso female halves into shelf top and bottom edges Install Tenso male halves in fascia…
Read More
Great combination of CNC machines and Zeta P2 and Zeta P2 Cordless
How it works: P-System Groove in Surface Position of drill holes, ø 5 mm / ø 8 mm Drill positioning holes with a CNC, ø 5 mm / ø 8 mm Insert the positioning pins into the Zeta P2 Position the machine in the holes How it works: P-System Groove in Edge Drill positioning holes…
Read More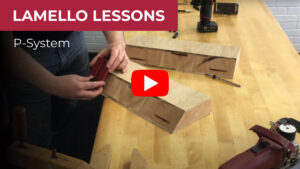
How to Build a Waterfall Edge Table
Transcript:This is Chris from Lamello. In this video, we’re gonna show you how to clamp waterfall countertop edges or thick mitered material. We’ve shown you in other videos how you can clamp together a three-quarter material—it’s very easy, it’s a one-step process. Here, we don’t want to make one line of connectors across the middle…
Read More
Beveled Riser-to-Stringer Assembly with Tenso P-14
How it works: Make P-Systems lots in stringer and risers using stop square Install Tenso female connectors on beveled edge of risers Install Tenso male connectors in beveled edge of stringer Glue beveled edges of finished stair parts and apply adhesive to backside of riser Assemble riser to stringer Crisp seams with no visible fasteners
Read More