How to Join Waterfall Bevel Joints in Thick Material with No Clamps
Hey everyone, it’s Matt from Matt Moore Designs and we’re here in our most recent kitchen renovation where we just finished the installation process of this bar area. The area consists of a beverage cooler, a stack of drawers, but most eye-catching is this solid 8/4 grain wrapped waterfall countertop.
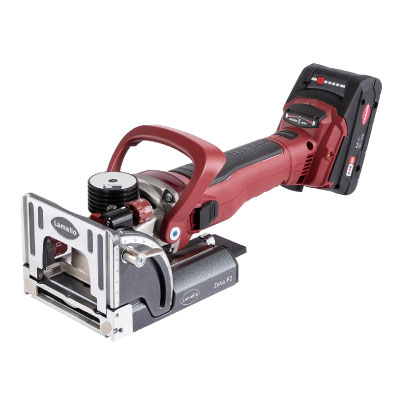
Traditional clamping methods to create a waterfall countertop would require very long bar clamps. It would be heavy and cumbersome to transport. And we basically have to shop glue it up, transport it, and install it in all one piece. I’m here to show you how the Lamello Zeta P2 can make large-scaled mitered connections very quickly, accurately, and efficiently.
After cutting the miters, we highly suggest dry fitting the countertop. The last thing you want to do is start fitting your P System connectors in this miter only to realize that when they come together, it’s not the proper angle. We test fit this one already and it looks great. So, we’re going to get it back onto the bench and we’re going to lay out our P system connectors in the miter.
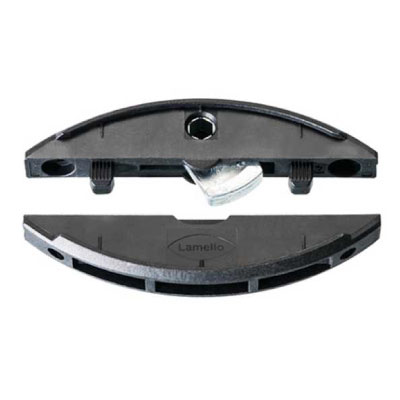
To connect the miter fold in the countertop, we’re going to be using the Zeta P2 and the P14 Clamex connectors. Anytime you’re using the Zeta and P series connectors, you want to ensure that your top knob matches your fitting size, in this case 14, and your bottom knob is set to max.
The Zeta machine has built-in features to allow alignment on miters. You can use the flip down fence to align the machine to the inside of a miter and adjust the height by using the provided shims. Just place the shim on the fence and it’ll move the machine up on the miter.
Like aligning to the inside of the miter, the machine has provisions to allow you to line up with the outside point of a miter. The stop square can be slid onto the machine and use the angled detent cut out of the stop square to locate on the point of the miter for an outside reference.
Although the machine has provisions to reference the point of the miter, we find it easier to use this third party attachment from our friend Keith Johnson to allow a larger base to reference the material when working off the point of a miter.
Anytime you use the P System connectors in a mitered connection thicker than 3/4 of an inch, it is recommended to use a W pattern or as here shown an M pattern to distribute the clamping force across the miter. This ensures that when you clamp the miter together, there is no rocking due to the connectors being aligned.
Spacing of P series connectors is very important. It’s recommended to have them spaced no more than 12 in apart. Here you can see we’re locating our connectors based off a center line of the countertop and spacing each connector 10 in apart. That’s going to ensure proper spacing and proper clamping force achieved by the Clamex connectors.
Because we are using a W pattern offset of our connectors, we will have two depth settings. Here you can see we’re setting the depth for the top connectors or the connectors closest to the long point. When setting the height of the connectors, you want to ensure that you are not going to cut through the face of the countertop.
Anytime you run the Zeta P2 machine, you want to ensure that your pieces are clamped down securely and that you’re running some sort of vacuum for dust collection. Here we are cutting the top row of slots for our Clamex connectors. Because our W layout and size of countertop, we had a total of five connectors in this miter.
Because the outside of our miter is going to be our show face, we put three connectors to the outside and we put two connectors towards the inside. Like we did on the top row of connectors, our bottom row will also be spaced at 10 in apart. However, we are splitting that 10 in on the center line of the countertop. This will ensure that the bottom row of connectors will be offset from the alignment of the top.
After laying out the bottom row of connectors, it’s important to adjust the machine for the lower setting of our offset. Here you can see we’re sliding the stop square up the machine, which is lowering the cut. Once all the settings of the machine are dialed in, all that’s left is to repeat the process and cut all our connector slots.
Because we’re using Clamex connectors on this miter, we need to use the provided drilling jig that comes with the Zeta machine to drill an access hole for the Allen key to tighten the connectors.
We first adjust the jig for the shallower pair of slots and drill our access hole. Then can loosen the jig and adjust it for the deeper set of slots and drill the access hole for those as well.
Once all the access holes are drilled and the debris is cleared out, all that’s left is to insert the P2 connectors, starting with the male side and then the female side in the opposing part.
Once all the connectors have been installed, it’s recommended to dry fit the miter joint to ensure that the connectors are aligned and they pull the miter tight. One of the biggest advantages of using Clamex connectors in a miter joint like this is having the ability to remove the joint for transportation, final sanding, and finishing.
Due to their construction, waterfall countertops are often difficult to install because you have to scribe to the floor and to the wall surrounding them. Having the ability to disconnect the countertop into two pieces, scribe each piece individually to fit the space to transport outside and make the cuts and transport back in eliminates the amount of weight that has to be carried back and forth and the risk of damage to the piece.
Because we use clams connectors, once each individual piece is cut and fit, you also have the option to take and final sand, apply finish, do whatever you need to do. And when the time comes to install, it’s as simple as lining up those connectors and tightening them down with the Allen wrench just as we did in the dry fit.
There’s no better feeling after creating a countertop like this than sliding it into place and the scribes fitting perfectly and having a nice tight clean miter across the waterfall.
So, that’s how easy it is for the Lamello Zeta P2 and the P series connectors to aid you in creating and connecting a mitered waterfall countertop. Not only does it give you the advantage to create a nice strong joint, but it allows you to disassemble, transport, install, and reconnect it whenever you need to.
Be sure to follow along with Lamello USA’s YouTube page for any additional tips and tricks and how the Zeta system and the P2 connectors can help you achieve the final result of your projects.